Introduction to Async/Await in SwiftUI
Swift's async/await pattern, introduced in Swift 5.5 (iOS 15+, macOS 12+), revolutionized how we write asynchronous code. Before its arrival, developers often relied on completion handlers or Combine publishers, which, while powerful, could lead to complex code structures like 'callback hell.' async/await provides a more linear, readable, and less error-prone way to express asynchronous operations.
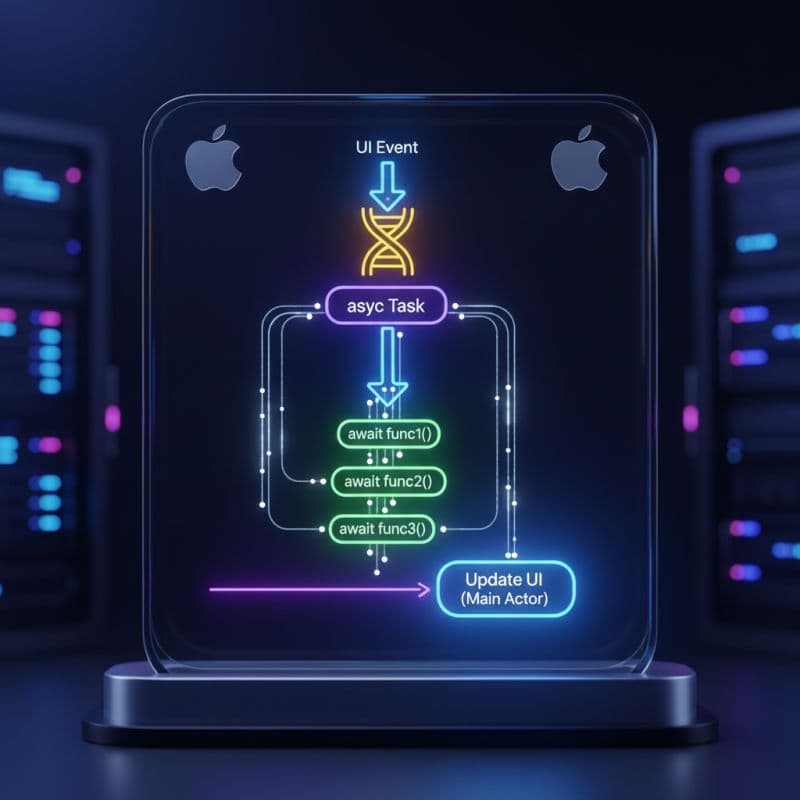
In SwiftUI, an application's UI must remain responsive. Performing long-running tasks, such as network requests, heavy computations, or file I/O directly on the main thread, will freeze your UI, leading to a poor user experience. async/await allows you to offload these tasks to background threads transparently and then safely update the UI once the results are available. This article will guide you through integrating these powerful tools into your SwiftUI views and view models.
At its core, async marks a function as asynchronous, meaning it can suspend its execution at certain points (await) and resume later without blocking the thread. The await keyword indicates a potential suspension point, allowing other tasks to run while the awaited operation completes. This cooperative concurrency model is a significant improvement over traditional threading models, reducing the complexity of managing locks and race conditions.
Basic Usage: Fetching Data Asynchronously
One of the most common use cases for async/await in SwiftUI is fetching data from a remote server. Let's start with a simple example where we fetch a list of items and display them.
To perform an asynchronous operation in a SwiftUI view, you typically use a .task view modifier or a @StateObject's init method. The .task modifier is ideal for operations that are tied to the lifecycle of the view. It automatically handles cancellation when the view disappears, preventing unnecessary work and potential crashes.
Consider a scenario where you're fetching a list of users. You'd define an asynchronous function to perform the network request and then call it within .task.
Let's define a simple User struct that conforms to Decodable and a mock UserService to simulate network calls. We'll use Task.sleep to simulate network latency.
Updating UI from Asynchronous Operations
It's crucial to remember that all UI updates in SwiftUI must happen on the main thread. While await helps manage background execution, it doesn't automatically switch back to the main thread for UI modifications. You might have noticed DispatchQueue.main.async in the previous example. Swift's structured concurrency introduced the @MainActor attribute, which simplifies this process considerably.
By marking a type (like a ViewModel), a method, or a property with @MainActor, you guarantee that all access to properties and execution of methods on that type/method will occur on the main actor. This makes updating your UI from asynchronous contexts much safer and cleaner, eliminating the need for explicit DispatchQueue.main.async calls in many cases.
Let's refactor our UserListView to use a ViewModel and @MainActor for better separation of concerns and safer UI updates. This pattern is highly recommended for building scalable SwiftUI applications (iOS 15+, macOS 12+).
Handling Asynchronous Actions and Error Propagation
When dealing with async/await, proper error handling is paramount. try, catch, throw are integral parts of this new concurrency model. You should always wrap await calls that might throw an error within a do-catch block. This allows you to gracefully handle network failures, decoding errors, and other issues that might arise during asynchronous operations.
Additionally, you might want to trigger async operations from user interactions, like a button tap. You can do this by creating a Task explicitly within an action closure. This is useful when the asynchronous work isn't directly tied to the view's lifecycle but rather to a specific user event.
Let's add a button to our user view that allows us to add a new user and demonstrates a more complex asynchronous flow, including error handling. We'll simulate an addUser operation in our UserService.
Best Practices for Async/Await in SwiftUI
Adopting async/await effectively in SwiftUI involves more than just syntax; it's about structuring your code for maintainability, testability, and performance.
-
Use
@MainActorfor ViewModels: Always mark yourObservableObjectclasses (or relevant parts) with@MainActorif they interact with UI-bound@Publishedproperties. This provides compile-time safety, ensuring that UI updates always happen on the main thread without manual dispatching. -
Leverage
.taskmodifier: For operations tied to a view's lifecycle (e.g., initial data fetching, background work that should stop when the view disappears), use the.taskmodifier. It automatically handlesTaskcreation and cancellation, reducing boilerplate. -
Explicit
Taskfor User Interactions: When an asynchronous operation is triggered by a user action (like a button tap) and is not directly tied to the view's lifecycle, wrap theawaitcall in aTaskblock within the action closure. This scopes the asynchronous work correctly. -
Error Handling with
do-catch: Always usedo-catchblocks aroundtry awaitcalls to handle potential errors gracefully. Propagate specific errors where possible to provide meaningful feedback to the user. -
Small, Focused Async Functions: Break down complex asynchronous workflows into smaller, reusable
asyncfunctions. This improves readability and makes testing easier. -
Cancellation is Key: Familiarize yourself with
Task.isCancelledandtry Task.checkCancellation(). While.taskhandles automatic cancellation, you might need to manually check for cancellation in long-runningasyncfunctions to prevent unnecessary work. -
Avoid Blocking the Main Actor: Even with
@MainActor, heavy synchronous computations within an@MainActormethod will still block the main thread. For CPU-intensive work, useTask.detachedorTask { await someHeavyComputeFunction() }without@MainActorfor the computation itself, then use@MainActorto update the UI with the result. Alternatively, specific executors might be a better fit for highly specialized tasks.
By following these best practices, you can build robust, responsive, and maintainable SwiftUI applications that leverage the full power of Swift's modern concurrency features.