Introduction to the macOS App Lifecycle
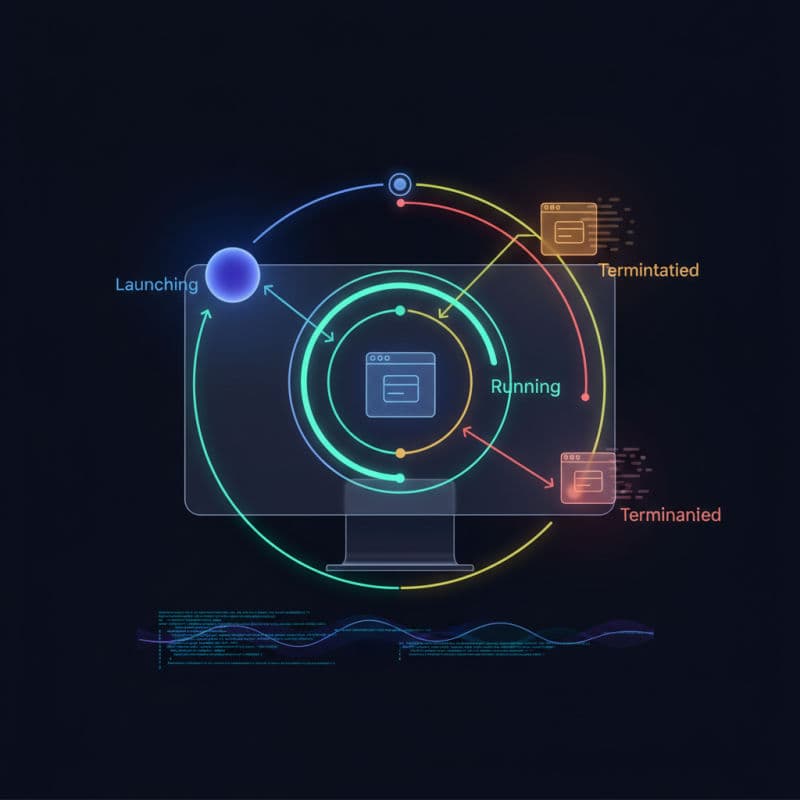
Every macOS application, regardless of whether it's built with AppKit or SwiftUI, follows a defined lifecycle. This lifecycle dictates how your app starts, runs in the foreground or background (less common for full macOS apps than iOS), and eventually terminates. Managing this lifecycle correctly is crucial for several reasons:
- Resource Management: You need to know when to allocate and deallocate resources like memory, files, and network connections.
- State Preservation: Saving and restoring your app's state ensures a consistent user experience across launches.
- System Integration: Responding to system-level events, such as application activation or changes in user defaults, is a key part of being a good macOS citizen.
- Performance: Efficiently handling lifecycle events can prevent UI freezes, crashes, and excessive power consumption.
Historically, macOS apps heavily relied on NSApplication and its delegate (NSApplicationDelegate) to manage the lifecycle. While SwiftUI's App protocol simplifies this for newer apps (macOS 11.0+), the underlying AppKit mechanisms still play a significant role and are important to understand, especially when interacting with older APIs or building more complex applications. This guide will cover both approaches, highlighting their differences and commonalities.
Understanding these stages allows you to write code that behaves predictably and efficiently, providing a superior experience for your users.
The Core Components: NSApplication and NSApplicationDelegate
At the heart of every macOS AppKit application is the NSApplication shared instance. This object manages the entire lifecycle of your application, from event handling to menu bar management. NSApplication works in conjunction with its delegate, NSApplicationDelegate, which is a protocol that defines a set of optional methods your app can implement to respond to various lifecycle events.
When your app launches, the system creates an NSApplication instance. Then, it looks for an object that conforms to NSApplicationDelegate and assigns it as the application's delegate. This delegate is where you'll typically place your launch-time setup code, respond to global events, and perform cleanup before termination.
Key methods you'll commonly implement in NSApplicationDelegate include:
applicationDidFinishLaunching(_:): Called when the application has finished launching and is ready to run.applicationWillTerminate(_:): Called just before the application is about to terminate.applicationDidBecomeActive(_:),applicationWillResignActive(_:): Respond to activation and deactivation events.applicationShouldTerminateAfterLastWindowClosed(_:): Determines if the app should quit when its last window closes.application(_:openFiles:): Handles opening files passed to the application.
For SwiftUI apps (macOS 11.0+), while you might not directly instantiate NSApplication or NSApplicationDelegate, SwiftUI's App protocol internally leverages these AppKit mechanisms. For deeper integration or to access specific AppKit functionalities, you can still bridge to NSApplicationDelegate using the @NSApplicationDelegateAdaptor property wrapper.
Launch Sequence: From Main to applicationDidFinishLaunching
The journey of a macOS application begins long before applicationDidFinishLaunching is called. Here's a simplified overview of how an AppKit app launches:
main.swiftormain.m: The executable starts by calling themainfunction. For modern Swift apps, this is often implicit with the@mainattribute or a minimalmain.swiftthat callsNSApplicationMain.NSApplicationMain: This C function (or its Swift counterpart) initializes theNSApplicationinstance, loads the main NIB/Storyboard (if specified), and sets up the event loop.- App Delegate Instantiation: The system locates and instantiates your
NSApplicationDelegateclass, assigning it toNSApp.delegate. applicationWillFinishLaunching(_:): This is the first delegate method called, giving you a chance to perform very early setup before the app is fully initialized and its UI is loaded. Most commonly, you'd useapplicationDidFinishLaunching.- Loading UI: If your app uses a Main Storyboard or NIB, the system loads it, instantiates initial windows and view controllers.
applicationDidFinishLaunching(_:): After the UI is loaded and the app is largely ready, this method is invoked. This is the primary entry point for your application's logic, where you set up views, services, and prepare for user interaction.
For SwiftUI apps (macOS 11.0+), the @main attribute on your App struct simplifies this. When your App struct is launched, SwiftUI automatically handles the creation of the NSApplication instance and manages the high-level lifecycle events. The init() of your App struct is called early, and the body property is evaluated to construct your app's scene graph.
While SwiftUI abstracts away much of the NSApplication interaction, understanding the underlying sequence helps you diagnose issues and know where to hook into more advanced AppKit features if needed.
Responding to Activation and Deactivation
macOS is a multi-tasking operating system where users frequently switch between applications. Your app needs to gracefully handle being activated (brought to the foreground) and deactivated (moving to the background or becoming inactive).
applicationDidBecomeActive(_:):
This method is called when your application becomes the active (frontmost) application. This is a good place to:
- Resume any operations that were paused when the app was inactive.
- Refresh UI elements that might have become stale.
- Update menu items based on the current context.
- Restart animations or timers.
applicationWillResignActive(_:):
This method is called when your application is about to lose its active status, typically because another application is becoming active or a modal sheet is presented. Use this for:
- Pausing resource-intensive tasks.
- Saving temporary state that might be lost if the app crashes.
- Conserving resources like CPU and battery. (Less critical for macOS than iOS, but still good practice).
Remember that deactivation doesn't necessarily mean your app is going into the 'background' in the iOS sense; it simply means it's no longer the frontmost app receiving direct user input. It may still be performing background tasks. SwiftUI apps can observe these states using ScenePhase environment values, providing a more declarative way to react to these changes.
Termination: gracefully exiting the application
While macOS applications don't face the same strict termination pressures as iOS apps, proper handling of termination is still vital. Users can quit your app explicitly, or the system might terminate it under certain conditions (e.g., during a system shutdown).
applicationWillTerminate(_:):
This is your last chance to save user data, release critical resources, and perform any necessary cleanup before your application process is killed. You should:
- Save unsaved user data: This is paramount to prevent data loss. Use
UserDefaults, Core Data saving contexts, or custom file formats. - Close network connections: Ensure proper termination of network sockets.
- Release shared resources: Clean up file handles, database connections, or other system-wide resources.
- Remove temporary files: Delete any transient files created during runtime.
applicationShouldTerminate(_:) / applicationShouldTerminateAfterLastWindowClosed(_:):
These methods provide opportunities to prevent termination or customize termination behavior:
applicationShouldTerminate(_:) -> NSApplication.TerminateReply: Called when the application is asked to terminate. You can returnNSApplication.TerminateReply.terminateLaterto prompt the user to save unsaved work or perform extended cleanup before terminating.applicationShouldTerminateAfterLastWindowClosed(_:) -> Bool: By default, macOS Mail or Safari will not quit when their last window is closed. Other apps, like TextEdit, will. You can control this behavior by returningtrue(quit) orfalse(remain running in the background) in your App Delegate. If you returnfalse, your app will remain in the Dock and menu bar, potentially allowing it to handle background tasks or be reactivated without a full relaunch.
It's important to keep the work in applicationWillTerminate brief. If it takes too long, the system might kill your app before it completes, leading to data corruption or an unresponsive shutdown. Avoid performing network requests that require a response or complex computational tasks here.
State Restoration on macOS
macOS offers powerful state restoration capabilities that allow your application to seamlessly resume its previous state when relaunched, providing a much smoother user experience. This means windows reappear in their last known locations, selected items remain selected, and even scroll positions are restored.
State restoration is handled by AppKit and requires you to adopt the NSWindowRestoration and NSViewControllerRestoration protocols (or their SwiftUI equivalents via persistent identifiers).
Key steps for implementing state restoration:
- Enable Restoration: Opt-in by setting
NSWindow.restorationClassand giving your windows uniqueidentifierstrings. - Encode State: In
encodeRestorableState(with:)(orencode(with:)for custom objects), you save any relevant state information into anNSCoder. - Restore State: In
restoreState(with:)(orinit(coder:)for objects), you retrieve the saved state from theNSCoderand reconstruct your UI and data.
For SwiftUI (macOS 11.0+), state restoration is often simpler. You can use the scene identifier for WindowGroup to restore window configurations and rely on @State and @AppStorage for preserving simple data. For more complex view hierarchy state, you might need to combine StateObject with Codable models or bridge to AppKit for fine-grained control.
While optional, implementing state restoration significantly enhances the user's perception of your app's quality and responsiveness. It's especially useful for productivity apps that users leave open for extended periods.
Best Practices for a Robust macOS App Lifecycle
Creating a stable and responsive macOS application requires more than just understanding the lifecycle; it demands adhering to best practices:
- Do not Block the Main Thread: Long-running operations in lifecycle methods (especially
applicationDidFinishLaunchingor any UI-related method) will lead to an unresponsive UI and a poor user experience. Always offload heavy tasks to background queues. - Be Efficient with Resources: Release large objects, close open files, and cancel pending network requests when your app is deactivated or about to terminate. This conserves system resources and battery life.
- Separate Concerns: Keep your
AppDelegate(or top-levelAppstruct) focused on lifecycle events. Delegate specific tasks to dedicated managers, such as aUserDefaultsManagerfor preferences, or aDatabaseServicefor data persistence. - Graceful Error Handling: Ensure that even if a resource fails to load or save during a lifecycle event, your app doesn't crash. Provide informative feedback to the user where appropriate.
- Test Thoroughly: Test your app's launch, activate, deactivate, and termination sequences under various conditions, including rapid switching, system shutdown, and accidental quits. Check for memory leaks and unexpected behavior.
- Embrace SwiftUI's
AppandScenePhase: For new macOS 11.0+ apps, leverage SwiftUI's top-levelAppstruct and@Environment(".scenePhase")for a more Swift-native and declarative approach to lifecycle management. This simplifies handling common scenarios and integrates well with the view hierarchy. - Consider sandboxing implications: If your app is sandboxed, remember that file access and certain system interactions are restricted. Ensure your lifecycle logic respects these boundaries, particularly when saving and restoring state or accessing user files.
By following these best practices, you can ensure your macOS application is not only functional but also a well-behaved and reliable member of the macOS ecosystem.