Mastering the iOS Scene Lifecycle: SwiftUI & UIKit Explained
The iOS Scene Lifecycle is fundamental for building well-behaved and responsive applications. Introduced in iOS 13, it allows your app to manage multiple instances of its UI independently. This article explores the Scene Lifecycle for both SwiftUI and UIKit, providing practical examples to help you master scene management.
Introduction to the iOS Scene Lifecycle
Before iOS 13, applications followed a single application lifecycle managed by AppDelegate. With the introduction of iPadOS and the ability for an app to run multiple instances of its UI (e.g., multiple windows of Safari or Files), Apple introduced the Scene Lifecycle. This new paradigm allows you to manage different instances of your app's UI independently, each represented by a UIScene object.
A scene represents a single instance of your app's user interface. It can be running in the foreground, background, or be completely disconnected. This separation allows for more robust multitasking and a cleaner architectural approach to managing your app's various visual presentations.
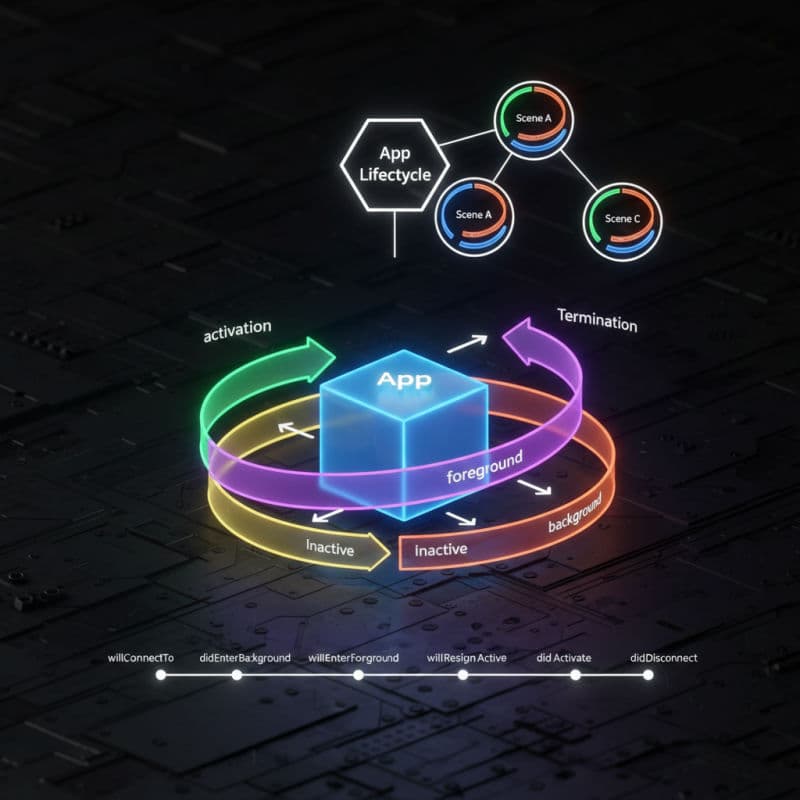
Key Scene States and Transitions
Understanding the different states a scene can be in is crucial for properly handling events and resources. Here are the primary states and how a scene transitions between them:
- Unattached: The scene is not yet connected to the app or has been discarded.
- Foreground inactive: The scene is visible but not receiving events (e.g., during an incoming call or system alert).
- Foreground active: The scene is visible and fully interactive, receiving user input.
- Background: The scene is not visible, but its processes are still running in the background. It can be suspended by the system to reclaim resources.
- Suspended: The scene is in memory but not executing code. The system can terminate it at any time.
Transactions between these states are managed by the system, and your app's SceneDelegate (for UIKit) or App struct (for SwiftUI) will receive callbacks during these transitions.
The SceneDelegate in UIKit
For UIKit applications targeting iOS 13 and later, SceneDelegate is where you manage scene-specific lifecycle events. The AppDelegate still handles app-wide events like launching, terminating, and push notifications, but the UI setup and scene-specific state changes are now in SceneDelegate.
Here are the most important methods you'll implement in your SceneDelegate:
scene(_:willConnectTo:options:): Called when a new scene session is being created. This is where you configure and attach the scene to a window and set its root view controller.sceneWillEnterForeground(_:): Called when the scene is about to move from the background to the foreground and become active.sceneDidBecomeActive(_:): Called when the scene has become active and is now receiving events.sceneWillResignActive(_:): Called when the scene is about to move from the active state to an inactive state (e.g., an alert is presented).sceneDidEnterBackground(_:): Called when the scene moves to the background. You should save data and release shared resources here.sceneDidDisconnect(_:): Called when a scene is being released by the system. This can happen for various reasons, such as the user closing the scene or the system reclaiming resources. You should clean up any scene-specific data here.
Let's look at a basic SceneDelegate implementation:
Scene Management in SwiftUI
SwiftUI, starting with iOS 14, provides a more declarative way to manage your app's structure and scene lifecycle. Instead of AppDelegate and SceneDelegate, you primarily work with the App protocol and its associated types.
Your app's entry point is now a structure conforming to the App protocol, which defines one or more Scenes. A Scene is a container for your app's UI, and SwiftUI offers several built-in scene types:
WindowGroup: The most common scene type, representing one or more independently movable and resizable windows. This is ideal for most applications.Settings: A specific scene type for macOS apps to display a settings window.DocumentGroup: For document-based applications, managing multiple documents.
Within your App struct, you use the @Environment property wrapper to observe scene phase changes. The ScenePhase enum has three cases: .active, .inactive, and .background.
Here's how you can monitor scene phase in a SwiftUI app:
Migrating from AppDelegate to SceneDelegate
If you're working with an older UIKit project that pre-dates iOS 13, you might need to migrate some of your AppDelegate logic to SceneDelegate. The general rule is:
- App-wide events (launch, termination, push notifications, core data setup): Keep these in
AppDelegate. - UI-related setup, window management, and scene-specific state saving/restoration: Move these to
SceneDelegate.
In your Info.plist, you'll also find the Application Scene Manifest entry, which defines how your app handles scenes. This is typically configured automatically when you create a new project with Xcode 11+.
Best Practices for Scene Management
To build robust and efficient applications, consider these best practices when dealing with the scene lifecycle:
- Save State on Background/Disconnect: Always save critical user data and the current UI state when the scene enters the background or disconnects (
sceneDidEnterBackgroundfor UIKit,.backgroundscenePhase for SwiftUI). This ensures a seamless user experience if your app is terminated and relaunched. - Release Resources on Background/Disconnect: When your scene goes into the background or disconnects, release memory-intensive resources that aren't immediately needed to reduce your app's memory footprint and reduce the likelihood of system termination.
- Perform UI Updates on Active/Foreground: Only perform UI updates and data refreshing when the scene is active (
sceneDidBecomeActivefor UIKit,.activescenePhase for SwiftUI). Avoid unnecessary background activity that drains battery. - Handle Multiple Scenes: Design your app assuming it might run in multiple windows. Avoid global singletons that manage UI state; instead, use scene-specific data models or provide mechanisms for distinct scene identities.
- Test Thoroughly: Test your app's behavior by moving it to the background, force-quitting, and relaunching, especially on devices with limited memory, to ensure proper state restoration and resource management.
Common Interview Questions
What is the main difference between AppDelegate and SceneDelegate?
The `AppDelegate` manages the overall application lifecycle, handling events like app launch, termination, and system-level notifications (e.g., push notifications). The `SceneDelegate` (introduced in iOS 13 for UIKit, effectively replaced by `App` and `Scene` in SwiftUI) manages the lifecycle of a specific instance of your app's UI, allowing for multiple windows or scenes to be controlled independently. Think of `AppDelegate` as the orchestrator for the entire application process, and `SceneDelegate` as the manager for an individual UI presentation.
Why was the Scene Lifecycle introduced in iOS 13?
The Scene Lifecycle was introduced primarily to support multitasking capabilities on iPadOS (and later extended to iPhone). It allows a single app to present multiple independent instances of its UI to the user, for example, two Safari windows side-by-side or multiple Mail compose screens. This required a new model to manage the state and resources of each individual UI instance, which the `AppDelegate`'s single-instance model couldn't effectively handle.
How do I communicate between different scenes in my app?
Communicating between different scenes typically involves shared data models or coordination patterns. For shared, persistent data, Core Data, Realm, or a custom data manager accessible from both scenes are good options. For event-driven communication, you can use `NotificationCenter` for simple broadcasts or combine it with a shared observable object (e.g., an `ObservableObject` in SwiftUI or a custom `NSObject` subclass in UIKit) to allow scenes to react to changes. Avoid direct UI-to-UI communication across scenes; instead, route events through a shared business logic layer.